Templatized Transformation using Databricks
Data transformation is the process of converting, cleansing, and structuring data into a usable format that can be analyzed to support decision making processes. The data transformation process converts raw data into a usable format by removing duplicates, converting data types, and enriching the dataset. The process involves defining the structure, mapping the data, extracting the data from the source system.
Data Pipeline Studio (DPS) provides templates for creating transformation jobs. The jobs include join/union/aggregate functions that can be performed to group or combine data for analysis.
For complex operations to be performed on data, DPS provides the option of creating custom transformation jobs. For custom queries while the logic is written by the users, DPS UI provides an option to create SQL queries by selecting specific columns of tables. Calibo Accelerate consumes the SQL queries along with the transformation logic, to generate the code for custom transformation jobs.
To create a Databricks templatized transformation job
-
Sign in to the Calibo Accelerate platform and navigate to Products.
-
Select a product and feature. Click the Develop stage of the feature and navigate to Data Pipeline Studio.
-
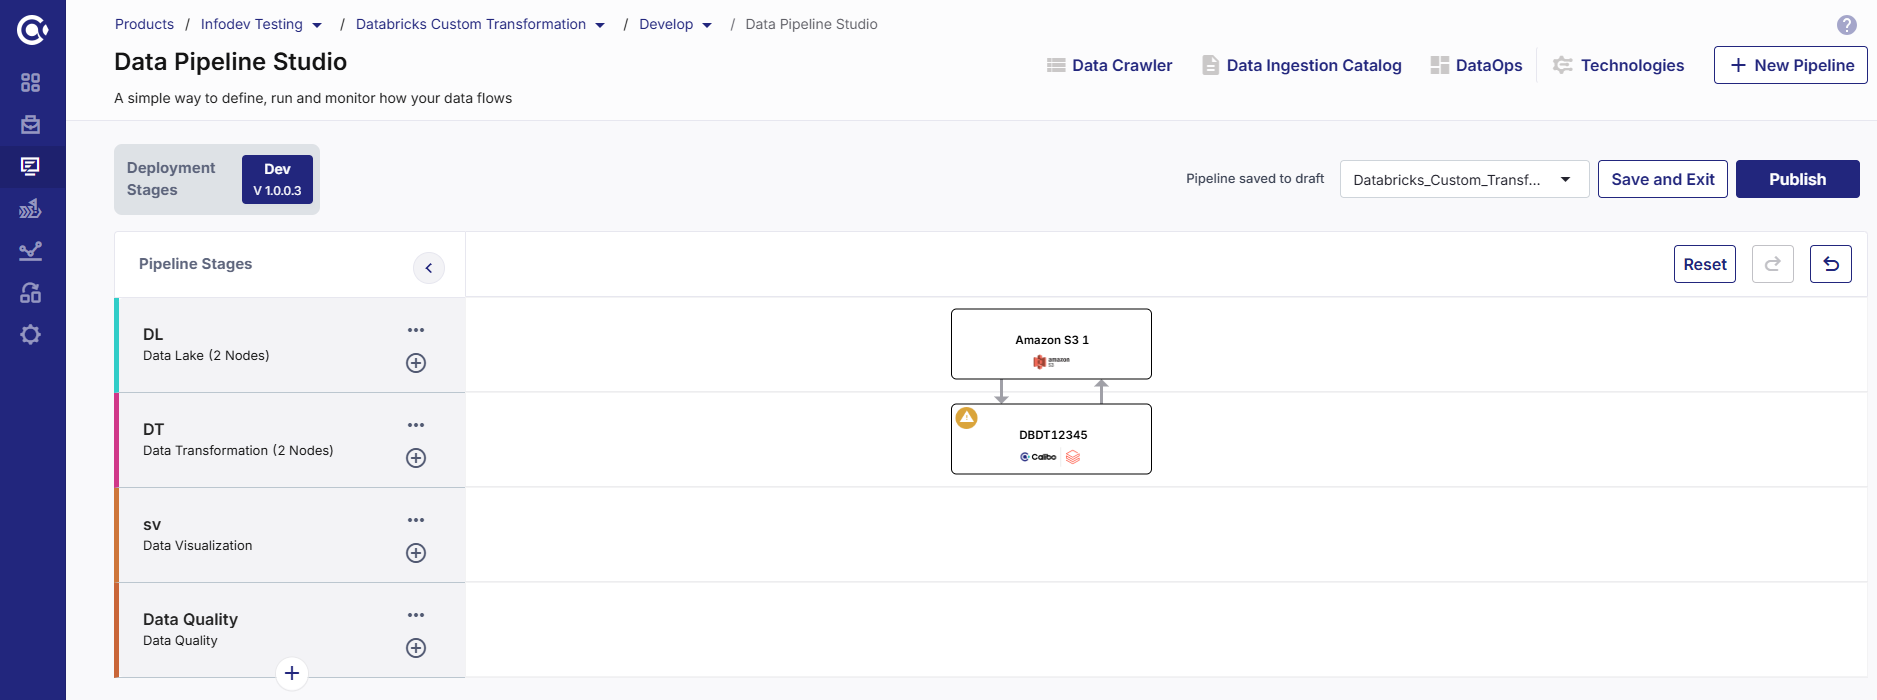
Create a pipeline with the following nodes:
Data Lake (Amazon S3) > Data Transformation (Databricks) > Data Lake (Amazon S3)
In the data transformation pipeline that you create, you can either add two data lake nodes or a single data lake node and connect the data transformation node to and from the same data lake node.
-
Click the Databricks node and click Create Templatized Job.
Complete the following steps to create the job:
Provide job details for the data transformation job:
-
Template - Based on the source and destination that you choose in the data pipeline, the template is automatically selected.
-
Job Name - Provide a name for the data transformation job.
-
Node Rerun Attempts - This is the number of times the pipeline rerun is attempted on this node in case of pipeline failure. The default setting is done at the pipeline level.
-
Fault Tolerance - Define the behavior of the node upon failure, where the descendent nodes can either stop and skip execution or can continue their normal operation. The available options are:
-
Default - If a node fails, the subsequent nodes go into pending state.
-
Proceed on Failure - If a node fails, the subsequent nodes are executed.
-
Skip on Failure - If a node fails, the subsequent nodes are skipped from execution.
For more information, see Fault Tolerance of Data Pipelines.
-
Review the configuration details of the source node:
-
Source - The selected source is displayed.
-
Datastore - The selected datastore is displayed.
-
Source Format - The source format Parquet is preselected. Currently Calibo Accelerate supports Parquet and Delta Table formats for Amazon S3.
-
Choose Base Path - To select the required folder, click Add Base Path. If you select one folder you can perform aggregation. To perform the join and union operations, you must select more than one folder.
The source data is picked up for transformation from the selected path.
-
Click Next.
Select the operation to perform for the transformation job from the following options:
This operation joins or combines the data from the selected files. You can perform different type of join operations depending on your use case. Provide the following information for the join operation:
-
Join Name - By default a target file is created with the following naming convention: File1-File2-JOIN. You can rename the file as per your requirement.
-
Partition/File - Select a file from the two files that you want to use for the join operation. Say you select Doctor.
-
Alias Name - You can provide an alternate name for the file. By default,
-
Define Joins - Select the appropriate options for the type of join you want to perform.
| Join Type |
Inner Join - Use this option when you want to combine data that exists in both the tables. |
|
|
|
| Partition/File 2 | Hospital |
| Alias Name | Hospital |
| On | Select the column with unique values in first table. In this case it is Hospital.HOSPTIAL_CODE |
| Join Operator | Select the operator. In this case it is =. |
| Field | Select the column with unique values in the second table. In this case it is Doctor.HOSPITAL_CODE |
| Join Type |
Left OuterJoin - Use this option when you want to retain all the records from the left table (which is the main table) and add relevant records from the right table. |
|
|
|
| Partition/File 2 | Hospital |
| Alias Name | Hospital |
| On | Select the column with unique values in first table. In this case it is Hospital.HOSPTIAL_CODE |
| Join Operator | Select the operator. In this case it is =. |
| Field | Select the column with unique values in the second table. In this case it is Doctor.HOSPITAL_CODE |
| Join Type |
Right Outer Join - Use this option when you want to retain all the records from the right table (which is the main table) and add relevant records from the left table. |
|
|
|
| Partition/File 2 | Hospital |
| Alias Name | Hospital |
| On | Select the column with unique values in first table. In this case it is Hospital.HOSPTIAL_CODE |
| Join Operator | Select the operator. In this case it is =. |
| Field | Select the column with unique values in the second table. In this case it is Doctor.HOSPITAL_CODE |
-
Add Filter - You can also add a filter to the join operation. This filters the matching records from the data combined after performing the join operation.
-
Click Add.
This operation combines the data from both the tables into a single data set.
Note:
To perform this operation both the tables must have the same schema.
-
Output File Name - By default a target file is created with the following naming convention: File1-File2-JOIN. You can rename the file as per your requirement.
-
Partition/File 1 - Select the first file to perform the union operation.
-
Partition/File 2 - Select the second file to perform the union operation.
-
Click Add.
This operation uses aggregate functions to summarize data from a table or file and provide a meaningful summary. You can select functions like Max, Mean, Min, Average to name a few.
-
Partition/File - Select a file to perform the aggregation operation.
-
Function - Select the function to use for the aggregate operation.
-
Column - Select the column on which the function is used.
-
Group By - Select the column on which you want the summarized data to be grouped.
-
Output File Name - By default a target file is created with the following naming convention: File name -Aggregation. You can rename the file as per your requirement.
The query is generated, based on the selected options.
-
Click Add.
Click Next.
In this step you map the source columns with the target columns.
-
Filter columns from selected tables- You deselect columns that you do not want to be included in the transformation query, as per your use case.
-
Add Custom Columns - Enable this option to add additional columns apart from the existing columns of the table. To add custom columns, do the following:
Click Add Custom Column after providing the details for each column. Repeat the steps for the number of columns that you want to add.
-
Column Name - Provide a column name for the custom column that you want to add.
-
Type and Value - Select the parameter type for the new column. Choose from the following options:
-
Static Parameter - Provide a static value that is added for this column.
-
System Parameter - Select a system-generated parameter from the dropdown list that must be added to the custom column.
-
Generated - Provide the SQL code to combine two or more columns to generate the value of the new column.
-
You can view the Added Custom Columns. You can update the custom column by clicking the pencil icon or delete it.
-
-
Click Next.
Configure the target node.
-
Target - AWS S3 is auto-populated based on the pipeline you create.
-
Datastore - The S3 datastore is already selected.
-
Target Format - Select one the following target formats:
-
Parquet - select this option if you want to use parquet format for target data.
-
Delta Table - select this option if you want to create a table with delta data.
-
-
Base Target Folder - Select a folder on the target S3 bucket.
-
Subfolder - Provide a folder name that you want to create inside the Base Target Folder. This is optional.
-
Output Data Folder - Provide a folder name in which the output of the transformation job is stored.
-
Operation Type - choose the type of operation that you want to perform on the data files from the following options:
-
Append - add new data to the existing data.
-
Overwrite - replace the old data with new data.
-
-
Enable Partitioning - enable this option if you want to use partitioning for the target data. Select from the following options:
-
Data Partition - Select the filename, column details, enter the column value. Click Add.
-
Date Based Partitioning - Select the type of partitioning that you want to use for target date from the options - Yearly, Monthly, Daily. Add a prefix to the partition folder name. This is optional.
-
-
Complete Output Path - Review the final path of the target file. This is based on the inputs that you provide.
-
Audit Log Path - Displays the path where the audit logs for the job are stored.
-
Click Next.
Enable the option if you want to publish the metadata related to the data to AWS Glue Metastore on S3:
-
Metadata Store - currently DPS supports AWS Glue.
-
Select a configured AWS Glue Catalog from the drop-down. See Configuring AWS Glue.
-
Database - the database name is populated based on the selection.
-
Data Location - the location is created based on the selected S3 datastore and database.
-
Select Entity - select an entity from the drop-down.
-
Glue Table - either select an existing Glue table to which the metadata gets added or create a new Glue table to add the metadata.
To run the configured job, select the type of Databricks cluster from the following options:
Cluster - Select an all-purpose cluster from the dropdown list, that you want to use for the Data Transformation job.
Note:
If you do not see a cluster configuration in the dropdown list, it is possible that the configured Databricks cluster has been deleted.
In this case, you must create a new Databricks cluster configuration in the Data Integration and Data Transformation section of Cloud Platform Tools and Technologies. Delete the data analyzer node from the data pipeline, add a new node with the newly created configuration, and configure the job again. Now you can select the newly configured Databricks cluster.
| What's next? iDatabricks Custom Transformation Job |